If already have your e-commerce platform on Magento 2 we
have the module for using our payments solutions.
How to install the Paymentez module for Magento 2
This module is a solution that allows Magento users to easily
process payments with Paymentez.
Download and Installation
1. Execute this command for install our package:
Install the latest version.
composer require paymentez/payment-gateway
Install a specific version.
composer require paymentez/payment-gateway:2.3.1
Once the installation finished, continue with the next
commands in your bash terminal.
2. Update dependency injection:
php bin/magento setup:di:compile
3. Update modules registry:
php bin/magento setup:upgrade
Optional.- This command is optional for production
environments:
php bin/magento setup:static-content:deploy
Now you can see the Paymentez settings in this path
Stores > Configuration > Sales > Payment
                    Methods
on your Magento admin dashboard.
Maintenance
If you need update the plugin to latest version execute:
composer update paymentez/payment-gateway or
composer require paymentez/payment-gateway:2.3.1
for specific version.
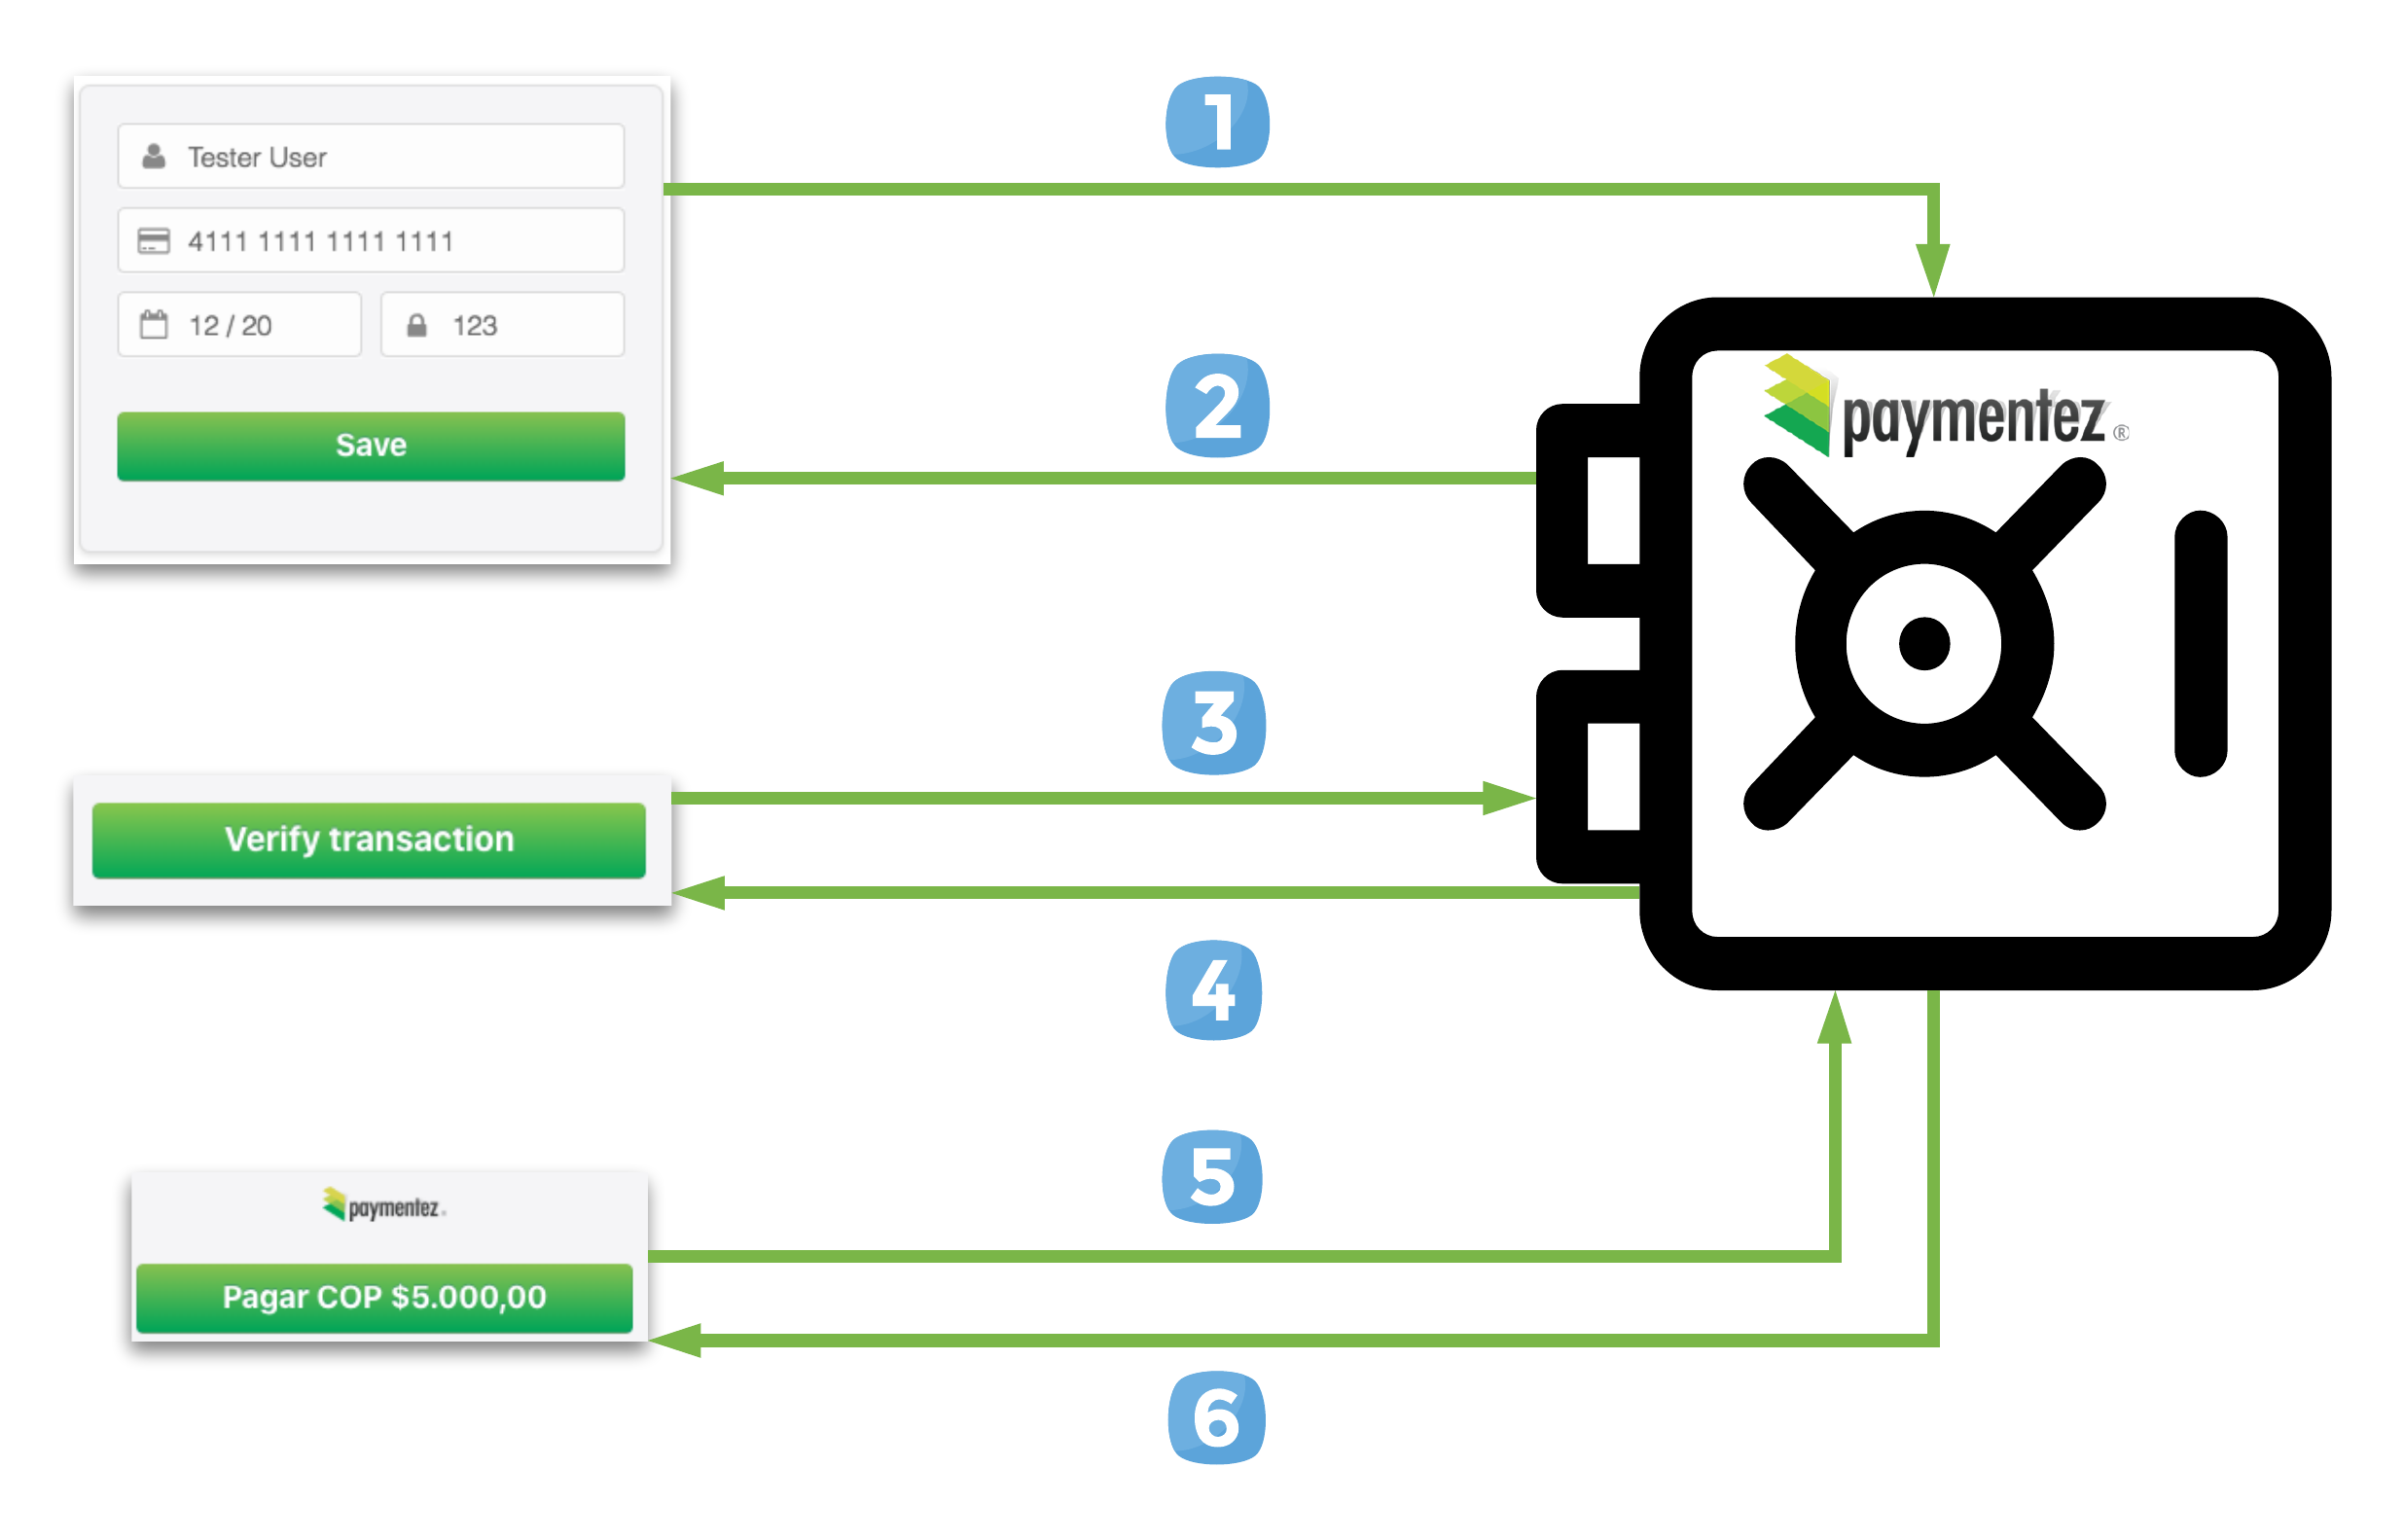
Webhook Notifications and Order Updates
Every time a transaction changes their status you will get an
HTTP POST request from Paymentez to your webhook.
The URL that will be used for the order updates via webhook
is:
https://magentodomain.com/rest/V2/webhook/paymentez
This URL will be configured on Paymentez.
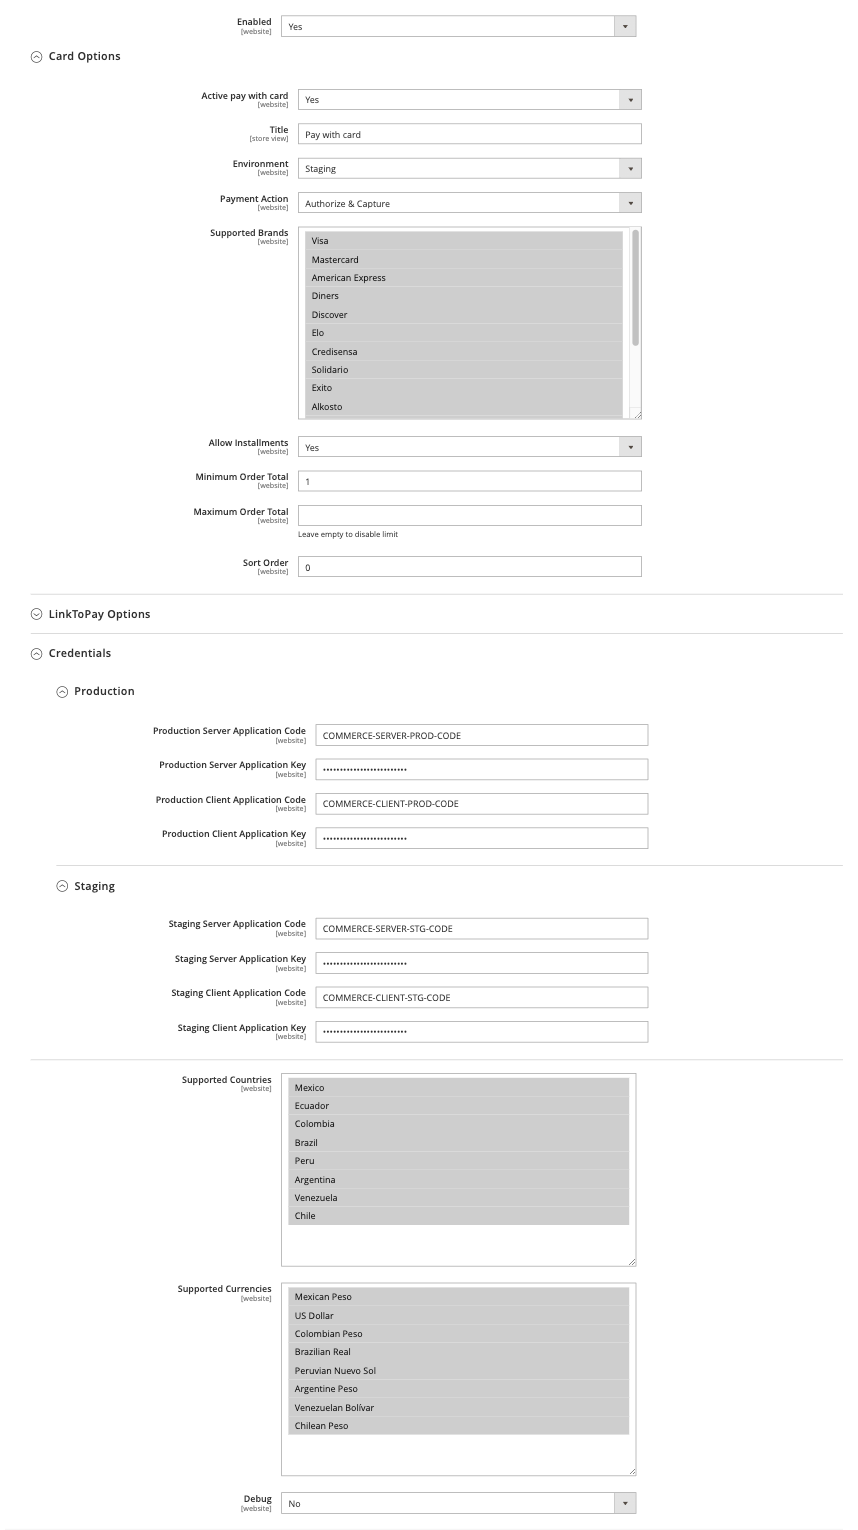
The Magento 2 configuration should look like this:
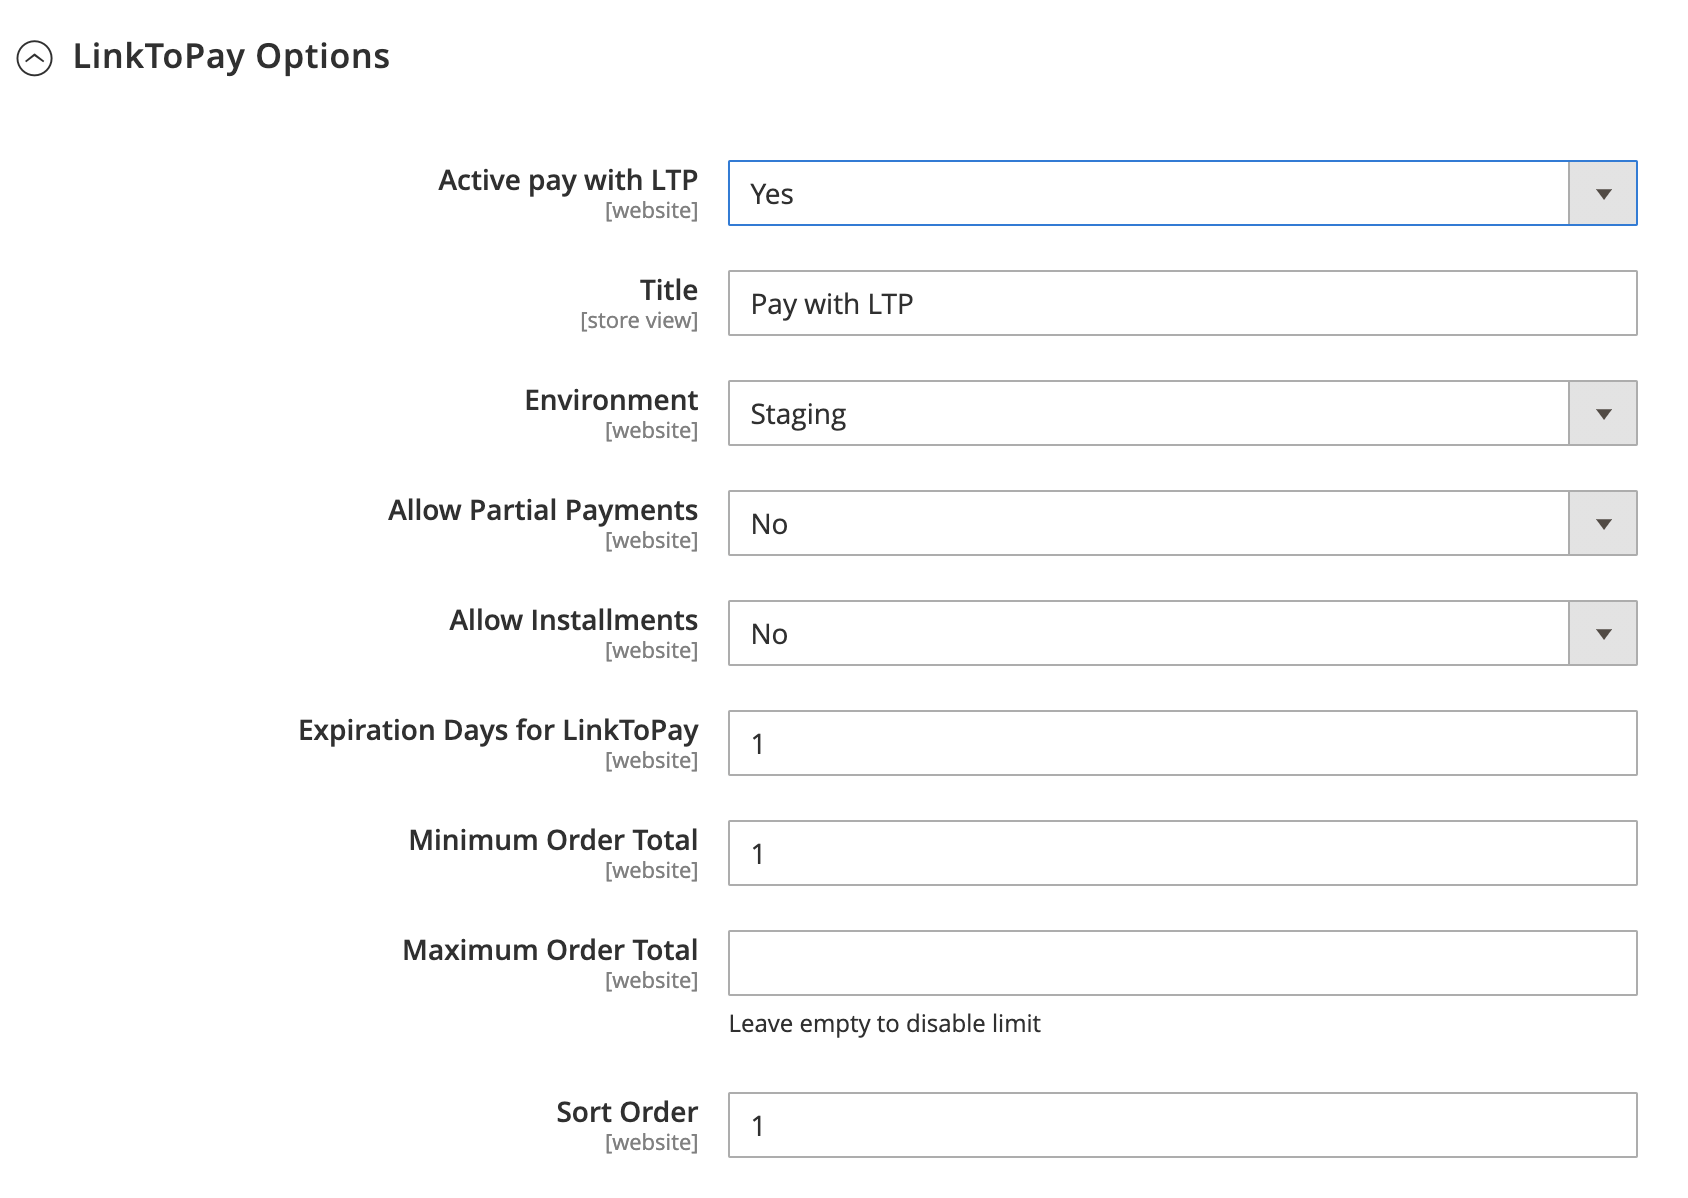
Configuration for LinkToPay:
Paymentez Payment Gateway Plugin for WooCommerce
This is a Wordpress plugin prepared to work as a payment
gateway for another plugin called WooCommerce.
1.- Prerequisites
1.1.- XAMPP, LAMPP, MAMPP, Bitnami or any PHP development
environment
- XAMPP: https://www.apachefriends.org/download.html
- LAMPP: https://www.apachefriends.org/download.html
- MAMPP: https://www.mamp.info/en/mac/
- Bitnami: https://bitnami.com/stack/wordpress
1.2.- Wordpress
If you already install the Bitnami option, this step can be
omitted.
The documentation necessary to install and configure Wordpress
is at the following link:
https://wordpress.org/support/article/how-to-install-wordpress/
All the minimum requirements (PHP and MySQL) must be fulfilled
so that the developed plugin can work correctly.
1.3.- WooCommerce
The documentation needed to install WooCommerce is at the
following link:
https://docs.woocommerce.com/document/installing-uninstalling-woocommerce/
There you will also find information necessary for
troubleshooting related to the installation.
1.4.- WooCommerce Admin
The documentation needed to install WooCommerce is at the
following link:
https://wordpress.org/plugins/woocommerce-admin/
There you will also find information necessary for
troubleshooting related to the installation.
2.- Git Repository
You can download the current stable release from:
https://github.com/paymentez/pg-woocommerce-plugin/releases
3.- Plugin Installation
The development works like a Wordpress plugin that connects to
another Wordpress plugin, WooCommerce.
So when it is installed and activated, WooCommerce and
Wordpress hooks and actions are used.
3.1 Installation and Activation Through Wordpress Admin
When we have the project compressed in .zip format, we proceed
to the installation through Wordpress Admin.
-
The first step will be to login into Wordpress Admin as
administrator.
-
Being in the main screen of the admin we click on the
Plugins tab.
Within the Plugins screen we click on Add New.
-
Within the Add Plugins screen we click on Upload Plugin.
-
The option to upload our plugin in .zip format will be
displayed. We upload it and click on the Install Now
button.
-
We will be redirected to the plugin installation screen.
We wait to get the message Plugin installed successfully
and click on the Activate Plugin button.
-
We will be redirected to the Plugins screen where we will
see our plugin installed and activated.
3.2.- Languages
The language of the plugin is dynamically selected according
to the language that is configured in Wordpress. The languages
that are available are: - Spanish - Spanish MX - Spanish CO -
Spanish PE - Spanish EC - Spanish LA - Portuguese - Portuguese
BR
4. Activation and Configuration of the Plugin in WooCommerce
After having installed our plugin in Wordpress we must proceed
to configure it in the WooCommerce admin.
This is found in the WooCommerce tab of the main WordPress
admin. Then we click on the Settings option and later on the
Payments tab.
4.1 Payment Gateway Activation
To activate our payment gateway within WooCommerce we need to
be within
WooCommerce -> Settings -> Payments and
we will see our plugin installed and detected.
To enable it we must activate the Enabled button. This
enablement is different from that of Wordpress which we did
previously.
4.2 Gateway Settings in WooCommerce Admin
By enabling our plugin in the WooCommerce admin, we will have
some options to configure. To do this we click on the Manage
button that will appear on the side of our plugin.
The options to configure are the following:
-
Staging Environment: When enabled, the
plugin will point to the Paymentez staging server.
-
Enable LinkToPay: If selected,
LinkToPay(Bank transfer, cash) can be used to pay.
-
Title: This option configures the text
that the customer will see in the checkout window next to
the Paymentez logo.
-
Customer Message: This option configures
the message that the customer will see in the checkout
window when they select Paymentez as the payment method.
-
Checkout Language: This option selects
the language that will be displayed in the checkout
window. The available options are Spanish, Portuguese and
English (by default).
-
Installments Type: Select the
installments type that will be enabled on the payment
screen (Only on card payment).
-
App Code Client: Unique identifier in
Paymentez.
-
App Key Client: Key used to encrypt
communication with Paymentez.
-
App Code Server: Unique identifier on the
Paymentez server.
-
App Key Server: Key used for
communication with the Paymentez server.
5.- Selecting the Plugin in the Store Checkout
When we have all our plugin activated and configured in
WooCommerce, we will see it available to be selected by
customers on the Checkout page of our store.
Just select it, fill in the Billing Details and click on the
Place Order button.
By clicking we will arrive at the Order-Pay or Pay For Order
window in which we will see a summary of our order. The
Purchase button will be displayed which will open the payment
checkout.
6. Process to make a Refund
The refund process will start in the main Wordpress admin
window.
We select the WooCommerce tab and click on the Orders option.
We select the order that we want to refund and the Edit Order
window will open.
In the item detail we will find the
Refund button, we click and the refund
options will be displayed.
We type the amount to be reimbursed and click the
Refund via Paymentez button. The status
within WooCommerce will change and so will the status on the
gateway.
7. Webhook Configuration
The plugin includes the functionality of a webhook to receive
the transaction updates that are made. This webhook receives
transaction notifications and updates them in the WooCommerce
admin and database.
To configure it, the merchant must provide its
Paymentez commercial advisor with the address
where the webhook is installed, it will be in the following
format:
https://{{URL-COMMERCE}}/wp-json/paymentez/webhook/v1/params.
Tenemos implementada la solución
eCommerce VTEX + Paymentez
Cómo configurar Paymentez v2
Para estas instrucciones se dará por hecho que el
encargado de VTEX por parte del comercio, conoce bien el panel
de administración.
Se deben de seguir los siguientes pasos:
-
Entrar a la configuración del apartado de pagos.
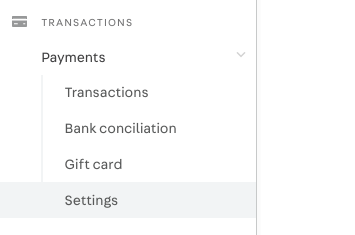
-
Seleccionar la pestaña de Gateway Affiliations y
agregar una pulsando sobre el botón de más.

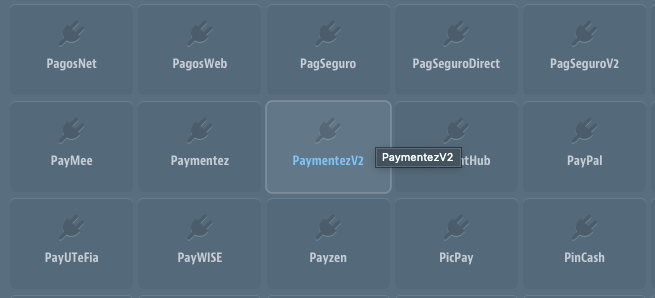
-
Dentro de lista ordenada alfabéticamente de OTHERS,
se debe buscar el conector con nombre PaymentezV2.
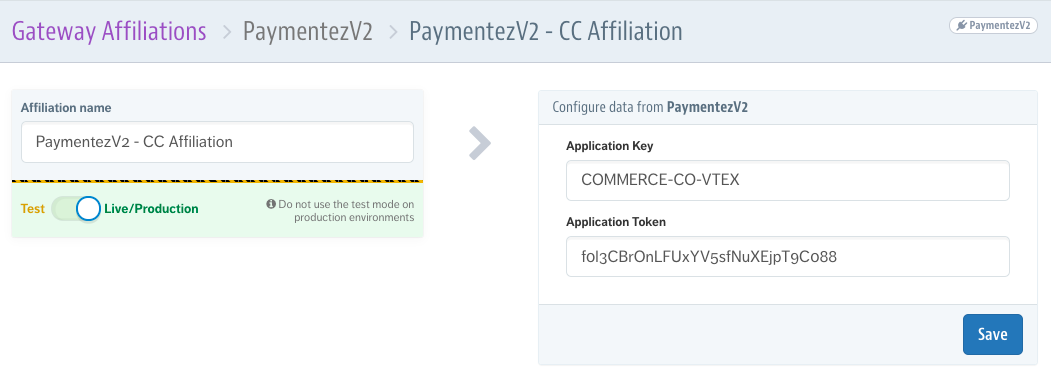
-
Una vez seleccionado el conector, se debe configurar, donde
Application Key es el Application Code proporcionado por
Paymentez y el Application Token es el Application Key
proporcionado por Paymentez. Se puede especificar ahí
mismo, el ambiente al cual se desea apuntar, quedando
Live/Production para ambiente de producción y Test
para el ambiente de staging. Quedando de la siguiente
manera:
-
Una vez configurada la afiliación. Esta se puede
asignar para el medio de pago que seleccione el
administrador.
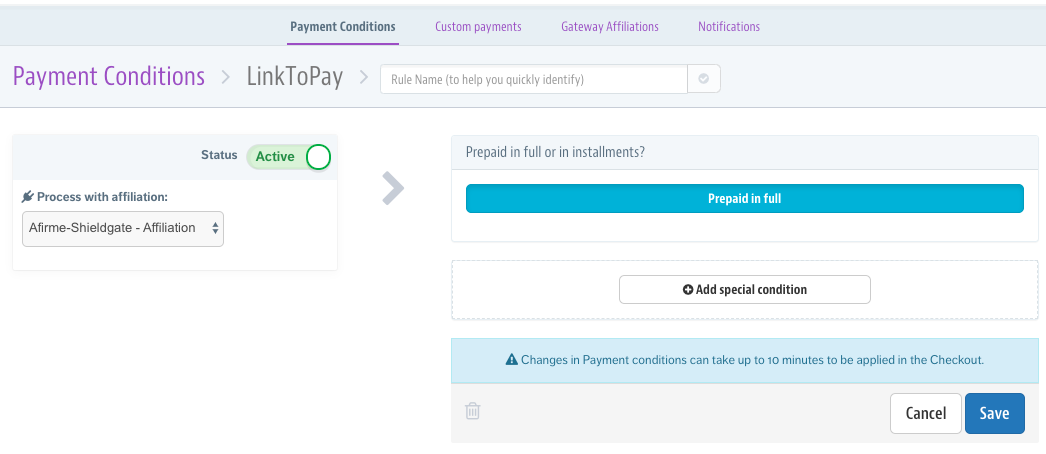
Cómo configurar Paymentez v2 para una franquicia ya
establecida
Tomar en cuenta que al asignar la afiliación a una
franquicia ya establecida, TODAS las transacciones con esa
franquicia se procesarán con Paymentez.
-
Entrar a la configuración del apartado de pagos.
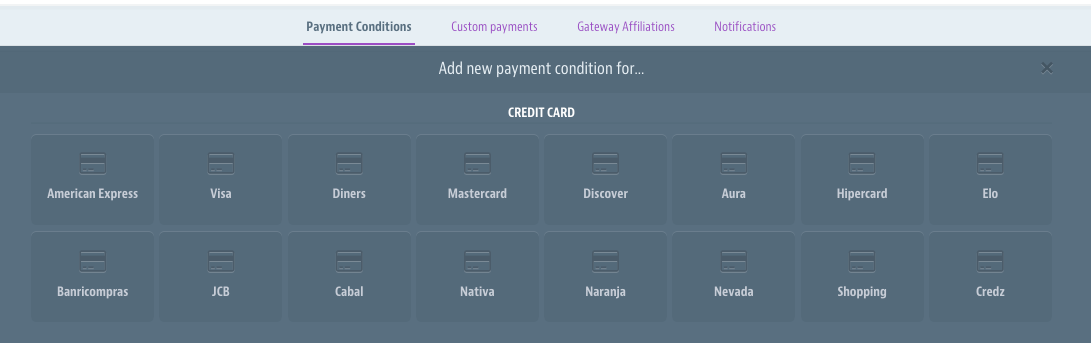
-
En la pestaña de Payment Conditions, agregar una
nueva condición dando clic al botón de
más.

-
Seleccionar la franquicia que se desea procesar con
Paymentez
-
Una vez seleccionada la franquicia, se debe asignar un
nombre a la condición y seleccionar la
afiliación de Paymentezv2
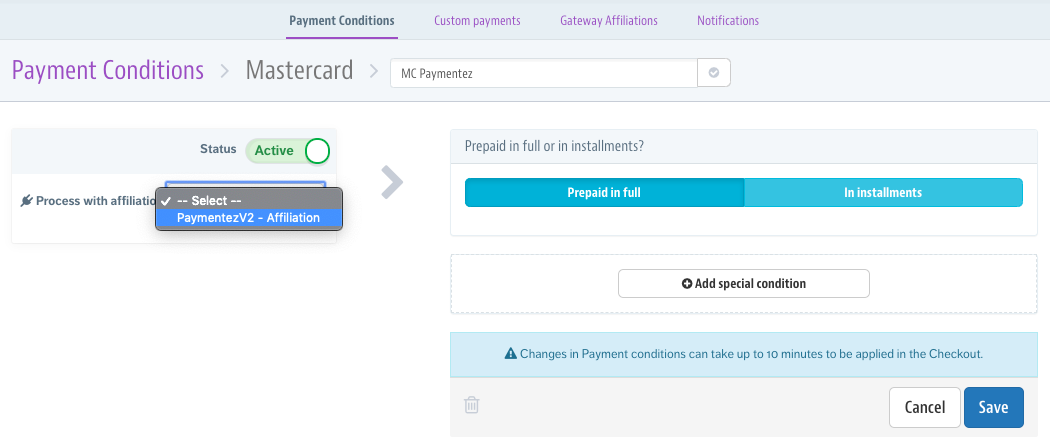
-
Sobre seleccionar pago completo o pago en cuotas, esto queda
a decisión y conocimiento del administrador VTEX del
comercio.
Cómo configurar Paymentez v2 para Cash
Tomar en cuenta que al asignar la afiliación a una
franquicia ya establecida, TODAS las transacciones con esa
franquicia se procesarán con Paymentez.
-
Entrar a la configuración del apartado de pagos.
-
En la pestaña de Payment Conditions, agregar una
nueva condición dando clic al botón de
más.

-
Dentro de OTHER existe la opción Cash, seleccionar
esta
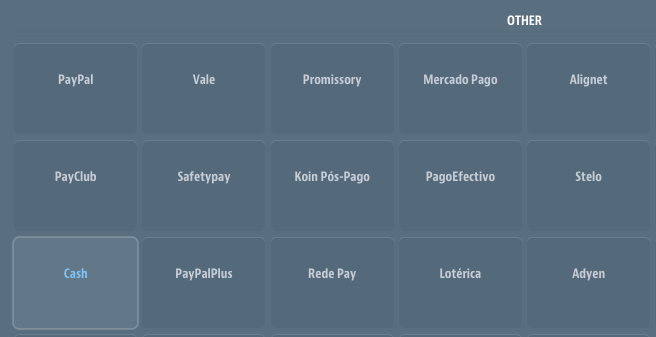
-
Seleccionar la afiliación configurada de Paymentez.
-
Sobre asignar condiciones especiales para el pago queda a
decisión y conocimiento del administrador VTEX del
comercio.
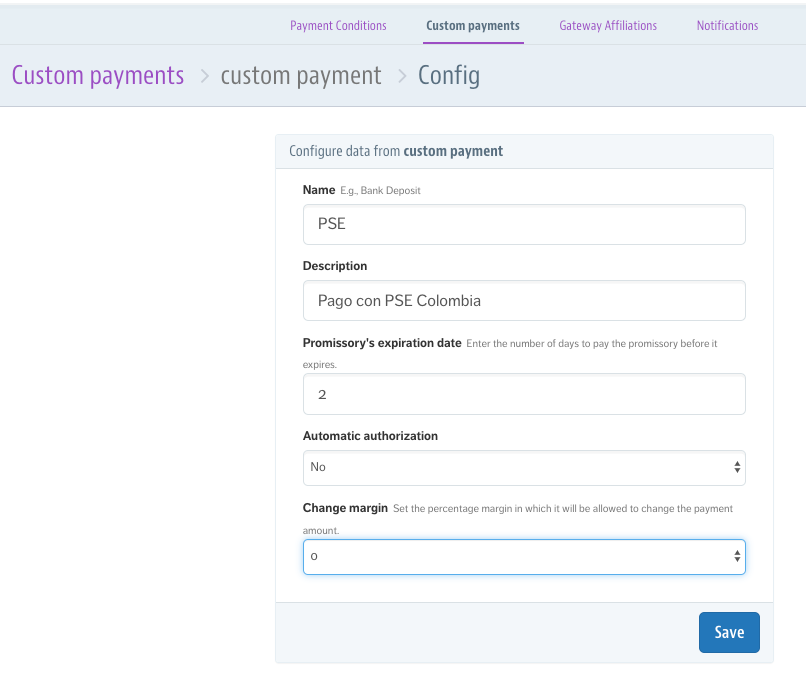
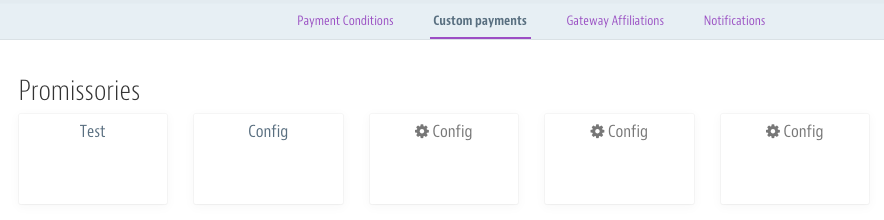
Cómo configurar Paymentez v2 para PSE (Solo Colombia)
PSE es un medio de pago que no aparece dentro de las opciones
existentes de VTEX, por esto es necesario crearlo a
través de un Promissories.
-
Entrar a la configuración del apartado de pagos.
-
En la pestaña de Custom Payments, agregar una nueva
condición dando clic a una casilla de Config.

-
Dentro de la configuración, se debe asignar el nombre
PSE (este nombre es completamente requerido ya que se usa
para identificar el medio de pago por parte del conector).
En tiempo de expiración, es requerido el 2, ya que de
lado de Paymentez se dan dos días para que el cliente
final pueda pagar. Los datos deben quedar como se muestra en
la imagen.
-
Seleccionar la afiliación configurada de Paymentez.
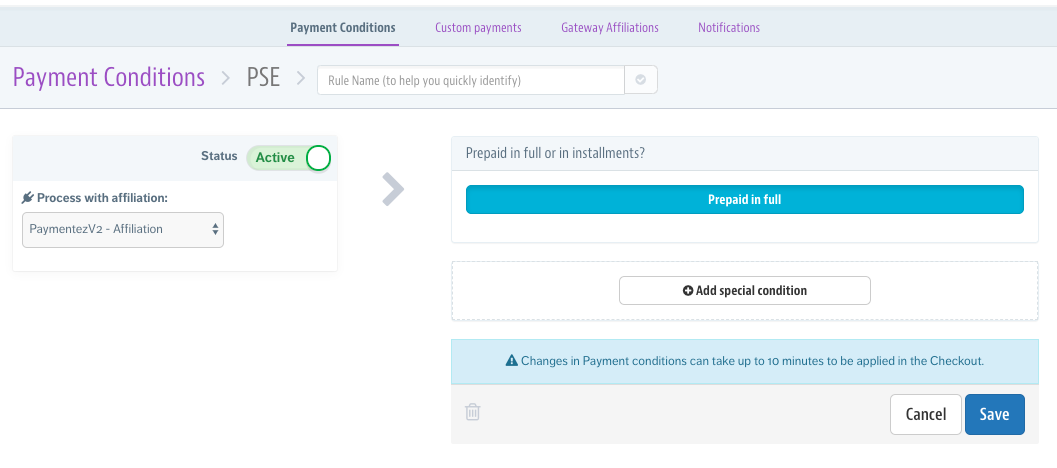
-
Sobre asignar condiciones especiales para el pago queda a
decisión y conocimiento del administrador VTEX del
comercio.
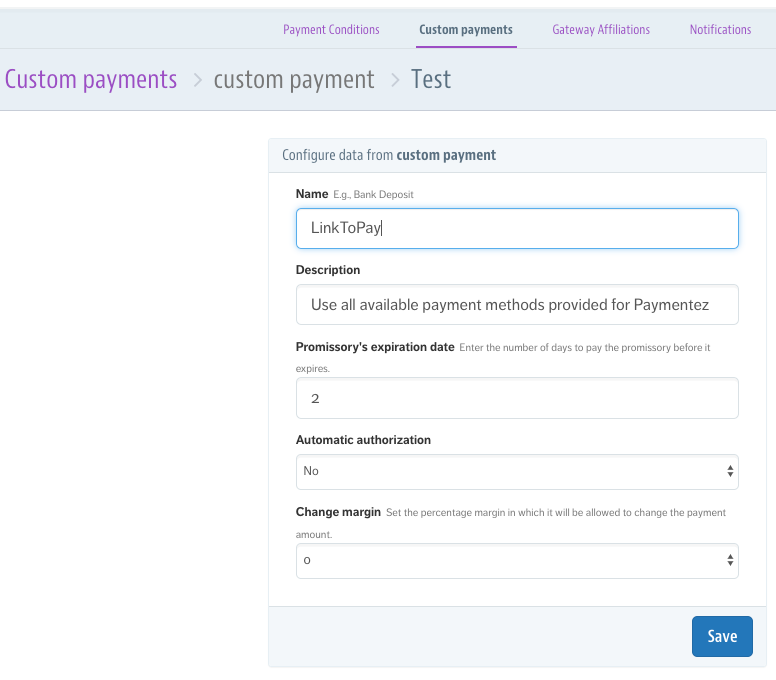
Cómo configurar Paymentez v2 para LinkToPay
LinkToPay es un medio de pago que no aparece dentro de las
opciones existentes de VTEX, por esto es necesario crearlo a
través de un Promissories.
-
Entrar a la configuración del apartado de pagos.
-
En la pestaña de Custom Payments, agregar una nueva
condición dando clic a una casilla de Config.
-
Dentro de la configuración, se debe asignar el
nombre LinkToPay (este nombre es completamente requerido
ya que se usa para identificar el medio de pago por parte
del conector). En tiempo de expiración, es
requerido el 2, ya que de lado de Paymentez se dan dos
días para que el cliente final pueda pagar. Los
datos deben quedar como se muestra en la imagen.
-
Seleccionar la afiliación configurada de Paymentez.
-
Sobre asignar condiciones especiales para el pago queda a
decisión y conocimiento del administrador VTEX del
comercio.
Paymentez Payment Gateway Plugin for Prestashop
1. Prerequisites
1.1. XAMPP, LAMPP, MAMPP, Bitnami or any PHP development
environment
- XAMPP: https://www.apachefriends.org/download.html
- LAMPP: https://www.apachefriends.org/download.html
- MAMPP: https://www.mamp.info/en/mac/
- Bitnami: https://bitnami.com/stack/prestashop
1.2. Prestashop
Warning, if you already install the Bitnami option this step
can be omitted.
Prestashop is an e-commerce solution, it's developed on PHP.
Now the last stable version is the 1.7.X. - Download:
https://www.prestashop.com/en/download - Install Guide:
https://www.prestashop.com/en/blog/how-to-install-prestashop
2. Git Repository
You can download the current stable release from:
https://github.com/paymentez/pg_prestashop_plugin/releases
3. Plugin Installation on Prestashop
-
First, we need to download the current stable release of
Paymentez Prestashop plugin from the previous step.
-
We need to unzip the file to get the
pg_prestashop_plugin-2.0.0 folder.
-
Now you rename the folder from
pg_prestashop_plugin-2.0.0 to
pg_prestashop_plugin.
-
Compress on zip format the folder to get a file called
pg_prestashop_plugin.zip.
- We need to log in to our Prestashop admin page.
-
Now we click on
Improve -> Modules -> Module Manager
-
In the Module manager we click on the
Upload a mudule button
-
We click on select file, or we can
Drop the Paymentez Prestashop plugin folder
on .zip or .rar format.
-
We will wait until the
Installing module screen changes to
Module installed!.
-
Now we can click on Configure button
displayed on the screen or in the
Configure button displayed on the
Payment section on the
Module manager.
-
Inside the
Payment Gateway Configurations we need to
configure or CLIENT/SERVER credentials provided by
Paymentez, we can select the
Checkout Language that will be displayed to
the user, also we need to select an
Environment, by default STG(Staging) is
selected.
-
Congrats! Now we have the Paymentez Prestashop plugin
correctly configured.
4. Considerations and Comments
4.1. Refunds
-
The 2.0.0 plugin version does not support
the Partial Refunds by Prestashop. However,
the plugin supports Standard Refunds by
Prestashop.
-
The Standard Refund can be interpreted as a
partial refund on Paymentez side, a success refund operation
depends on the configured payment network accepting partial
refunds.
4.2. Webhook
- Login into the Prestashop Back-office.
-
Navigate to Advance Parameters -> Web Services menu
options to open the Web Services page.
-
It will redirect to the Web Services page having the listing
of available Webservices, and the configuration form to
configure the service.
-
We need to enable the field called
Enable Prestashop webservice.
- Click on Save button.
-
Click on the Add new web service key button
to add new web service key to access only to the certain
resources of the Prestashop store.
-
We need to configure the Key, this is a
unique key. You can enter it manually or click on the
Generate button to generate a random key for the web
service.
-
We also configure the Key Description, you
can provide the description regarding the key for better
understanding.
-
We will set the Status on Enable to provide
a grant to access the data using the key.
-
Finally, we need to configure the
Permission field to provide the permission
to access the data using the certain key. Here we need to
search the resourde called
paymentezwebhook and select the
Add (POST) checkbox.
-
The webhook its located on
https://{mystoreurl}/api/paymentezwebhook?ws_key=KEY_GENERATED_ON_STEP_6.
- You need to give this URL to your Paymentez agent..